
Opacity Control in Textura

Learn how to adjust fabric opacity with precise values and use 100% opacity to automatically replace the alpha map for complete transparency control.
Improved Opacity Control
We've improved the Opacity control in Textura to provide greater precision and more accurate control over fabric transparency.
What's New?
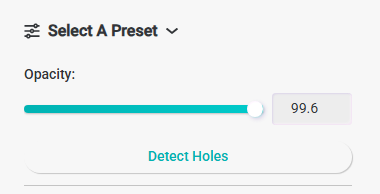
Precise Opacity Values: Textura no longer rounds opacity values in the UI. Opacity is now displayed more accurately (e.g., 99.6% instead of 100%).
Fully Opaque at 100%: Moving the opacity slider to 100% automatically replaces the existing alpha map with a fully opaque map (RGB 255, 255, 255), ensuring complete opacity.
Clear UI Feedback: A warning message appears when the slider reaches 100%, informing users that the existing alpha map will be overwritten.
Why It Matters
This update prevents fabrics with slight transparency from being incorrectly displayed as fully opaque. It provides greater transparency control and improves material accuracy and consistency across 3D visualization workflows.
How to Make a Fabric Fully Opaque
Textura automatically generates an alpha map using AI during fabric processing. If the AI detects even slight transparency in the fabric, the generated opacity value may be below 100% (e.g., 99.6%).
Step 1: Check the Opacity Value
Once your fabric has been processed, open the Edit Material section and check the opacity value.
Step 2: Set Opacity to 100%
To make the fabric fully opaque, move the opacity slider all the way to 100%.
Textura will automatically replace the existing alpha map with a fully opaque map (RGB 255, 255, 255), eliminating all transparency.
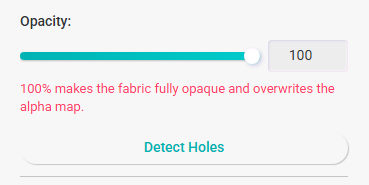
Important: Setting opacity to 100% replaces the original alpha map, including any transparent areas or holes in the fabric. Use this option only when the fabric should be completely opaque.