How To Tile Heather Fabrics

Tiling a heather fabric can be a challenging task. In this article, we will cover the steps to tile a heather from a fabric scan, to a digital twin.
Scanning a Heather Fabric
Heather fabrics contain various blended colored fibers or yarns, creating an interwoven mix of hues.
The colors don't repeat predictably, so during tiling, a specific color mix will repeat regularly. This can affect the natural look of the fabric's digital twin.
To capture the full range of color variations and surface patterns of heather fabrics, we recommended scanning a swatch that covers the entire tray of the scanner. Please note
For most types of fabric, scanning a swatch that is at least 10 cm x 10 cm, or 4 in x 4 or larger works fine for tiling work,
but for heather fabrics we recomend scaning as big as possible, the entire scan trade of A4.
Scanner trays are typically about 21.6 x 29.7 cm, or 8.5 x 11.7 inches. At this size using 1200 PPI the 10,200 x 14,040 pixel dimensions exceeds SEDDI Textura’s file size limits.
Our team at SEDDI would scan a 21.6 x 29.7 cm heather fabric swatch at 800-850 DPI. Please note that scan resolution should never be lower than 600 DPI.

Please note: This article only focuses on special requirements for tiling a heather fabric.
You can find detailed information on how to prepare typical fabrics for scanning here:
https://textura.user.com/knowledge-base/how-to-prepare-fabrics-for-scanning
Resample Your Fabric Scan in Photoshop
It's best to scan fabrics at the highest resolution from 600-1200 PPI when you scan your fabric on your scanner. setting, If you find that you need to reduce the size of a previously scanned image, here is a guide covering how to change the resolution for your file in Photoshop.
Upper toolbar: Edit- Image size
To determine if you need to reduce the size of your scanned image you can use Photoshop’s Image Size tool to view and adjust the pixel dimensions while preserving the highest resolution possible. If the dimensions listed 2nd from the top show that the total pixels for both height and width are at or under 10000 pixels there is no need to adjust the resolution of your scanned image. If your image exceeds the 10k pixel limit
you will need to “downsample” the image resolution. Start by checking the “Resample” box then select the link to keep the height and width scale proportional. Now you can enter a lower resolution value to see if it reduces your pixel total to under 10K for both height and width. Once you find the highest value that works click okay and save a PNG file to upload to SEDDi Textura
The heather fabric example shown here is over 10K pixels, so it is necessary to resample it. In this action there will be some data loss, so it is important to decrease it the least amount as possible.
It's important to keep the resolution as close to the original resolution as possible, and remember, always above 600 PPI.
Aligning Heather Fabrics
Aligning heather fabric will only occur on the vertical yarns,
Please note that the diagonal patterning across the width of the fabric is a part of the heather patterning for many knit heather fabrics like single jerseys
Any attempt to align the horizontal color stripes might result in a blurry image, as the adjustment angle will be too high and not accurate to the nature of the real fabric.
DO NOT: Remove the Gradient for the Heather Fabric
Utilize the Crop tool within the SEDDI Textura tiling tools to eliminate the gradient caused by light leakage along both sides of the scanner edge.
SEDDI Textura’s gradient tool is not recommended for use with heather fabrics for several reasons:
Removing gradient in heather fabrics can flatten the heather colors, resulting in a tiled fabric that will not be identical to the real fabric.
The gradient tool in SEDDI Textura has a size limit of 2500 x 2500 pixels. It will prompt you to crop your scanned image to the size limit, which could result in a tiled fabric that will not be identical to the real fabric.
Cropping the edge of the fabric after using the Alignment tool will solve both issues; the gradient and the pixels that were moved by the alignment process.
If you choose to try the gradient tool on your heather fabric proceed with caution and try making as few changes as possible and double-check to see if it looks just like the real fabric.
After using the Crop tool, if you have access to SEDDI Textura Workflow, we recommend implementing your changes and saving your work as a tiling tool version.
Learn more about how to use SEDDI Textura Workflow for tiling here:
https://textura.user.com/knowledge-base/how-to-use-workflow-for-tiling
If you're working with SEDDI Textura's Standard or Free license, you can continue working on your fabric file in one session, following this tutorial.
Tiling work and the "Tiling Assistance" tool rely on fabric alignment.
It is crucial to have the edges perfectly matched in order to achieve seamless tiling and continuity in your digital fabric.
There are a few methods to tile a heather fabric, choosing your preferred method depends much on the time consumption that you wish to dedicate for this task. Depending on the given fabric file, working in a combination of the above methods is often required.
Work With a Smaller, Aligned Area
Choosing an area of the fabric that is straight and working with it is often a good strategy. If such an area exists in your fabric, it is possible to choose a smaller piece of the fabric to work with that is characterized by straight lines.
The Pros and Cons of this method:
Pros: It's easy to work with.
Cons: It may result in too small of an area that will not resemble the real fabric.
It is recommended to use the first method described in this article—using the biggest aligned area as possible to achieve a high quality digital twin of your fabric.
Using the Crop Tool in SEDDI Textura's Tiling Tools as a Shortcut for Alignment
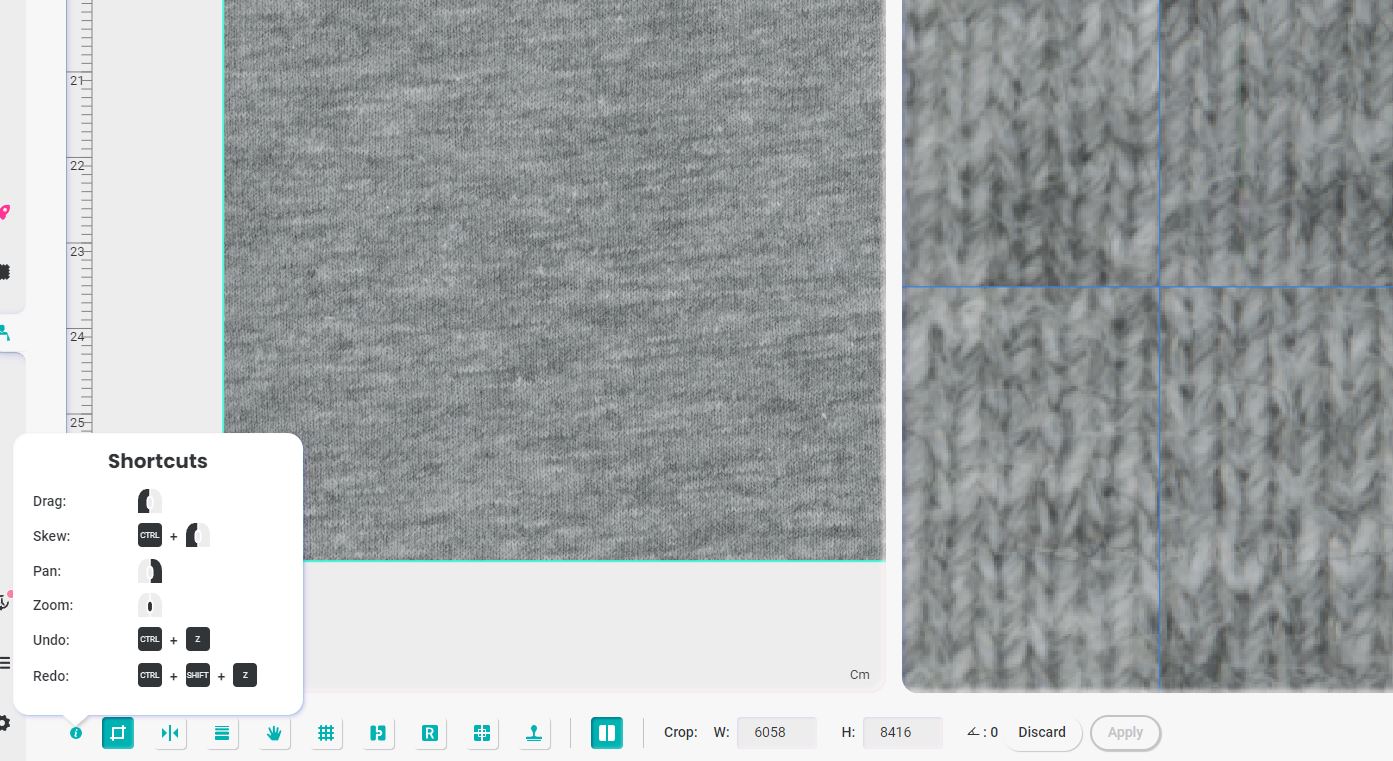
Press "ctrl" on Windows or "option" on Mac while working with the Crop tool, zoom in for the grid edge in the preview screen on the right and adjust the edges of the fabric until they match. It is most likely that this method will not be able to match all edges of the fabric, but it will get you to a larger straight area to work from.
Alignment Tool
Using the Alignment tool is only recommended once the fabric as perfectly aligned.
The Alignment tool works on the borders of the fabric to achieve a seamless repeat. If the fabric is not perfectly aligned it will most likely encounter difficulties when adjusting the fabric borders, resulting in pulling the misaligned edges into the center.
However, it is still possible to tweak it to get a larger aligned area that can be cropped from to get a perfectly aligned piece of the fabric.
In this example, we can see that there is a difference in the colors, and a yarn continuity issue on the bottom left of the fabric.
What to Do: Approve the Tiling Assistance work and crop the area that looks good in the right screen preview.
From there, use Tiling Assistance again on the smaller aligned area.
After approving the second alignment, we might get a smaller area that will result in a change to the overall colors of the heather fabric.
The SEDDI Textura Half Drop tool provides a solution for this problem. It enables you to organize your fabric tile in a half-drop configuration, resulting in a more evenly distributed spread of fabric yarn colors.
Clone Tool for Half-Drop Borders
The half-drop layout will produce inner borders that will need to be taken care of with the Clone tool.

Artistic Clone tools
In some cases with heather fabric, it is recommended to use the Clone tool artistically.
For most fabrics, the Clone tool is used to adjust the borders in order to create a seamless repeat.
In the case of heather fabrics and space dye yarn fabrics, the Clone tool could be used to copy the aesthetic of certain areas in order to achieve an evenly distributed spread of fabric yarn colors.
Puppet Warp in Photoshop
If you are working with SEDDI Textura Workflow, you can download your tiling version of your digital fabric, and straighten it with the Puppet Warp tool in Photoshop.

In Photoshop, set the Puppet Warp to the Density of more points, create guides at the edges of your fabric, and anchor your fabric file to the edges so it will not get too twisted during the Puppet Warp tool work.
Pros: It is precise.
Cons: It is a time-consuming task.
If you're unable to access Workflow but still wish to employ this method, you can proceed to generate maps at this point, approve your fabric, download it as a ZIP file, extract it, retrieve the Albedo, continue working on it, and then upload it again to SEDDI Textura as a finalized file.
Professional Tiling Services From Team SEDDI
Please note that It is also an option to contact the SEDDI Textura sales team for professional tiling services, especially If you have a high volume of fabrics to tile. We would be happy to support you.
A Heather Fabric Digital Twin
You can use your heather fabric to create a full collection of heather colors using the SEDDI Textura "Edit this Texture" feature.
For more information on this process, visit our color correction article here:
https://textura.user.com/knowledge-base/color-correction
SEDDI Textura Hacks
In the Public Material library, you can sort out the fabrics by fabric features, if you choose Yarn Dye, and Single Jersey for example, you will get these results:
Yarn Dye and Interlock for example will get these results:
Choose any of SEDDI Textura's existing heather fabrics and simply re-color them to your own needs using the Textura "Edit this Texture" feature.